
Let’s Encrypt – Free SSL Setup in 30 minutes or less
With pressure from Google on web designers to improve security on their websites, Let’s Encrypt is the perfect way to be pro-active and build integrity for your brand/website.
What is Let’s Encrypt?
Introduced in 2016, Let’s Encrypt represents a free open certificate authority (CA), which provides website owners with digital certificates for enabling HTTPS (SSL/TLS).
It was launched by the Internet Security Research Group (ISRG), a public-benefit organization sponsored by the Mozilla Foundation, the Electronic Frontier Foundation (EFF) and Cisco Systems, with the aim of making HTTPS encryption both affordable and user-friendly.
Their main goal is to create a more secure, privacy-driven web.
Let’s Encrypt certificates are:
- free to use: each domain name owner can obtain a trusted certificate at absolutely no cost;
- automatic: the certificate setup and renewal procedures are fully automated; no human intervention is needed;
- simple to use: there are neither payments to make nor validation emails to respond to;
- secure: Let’s Encrypt serves as a platform for implementing the latest security practices;
- fully transparent: all issued certificates are publicly available for anyone to view;
- open: the issuance and renewal protocol is published as an open standard that can be adopted;
- ‘self-regulated’: Let’s Encrypt is a joint community effort, beyond the control of any organization;
How Do I Implement Let’s Encrpty?
If you are using our hosting provided over at http://www.hipglosspro.com, then you are in luck. Let’s Encrypt is very easy to install using our server-side automation tool. This means you will not have to manually update it each year.
Login to your hosting account at http://www.hipglosspro.com, go to “Hosted Domains”. Using the tool icons to the left of your expiration date, select “Edit Domain”. From this popup, select your “Shared for SSL Use” IP from the IP drop-down and then select “Let’s Encrypt” under the SSL drop-down. To Save press the “Edit Domain” button.
The steps on the hosting side are complete. Now you will want to take a couple more steps to finish the SSL setup.
WordPress – SSL Plugin
If you are using WordPress, you will need to install the plugin called Really Simple SSL. This will quickly scan and fix your website so that images or other unsecured objects on your pages become secure.
Modify your .htaccess file
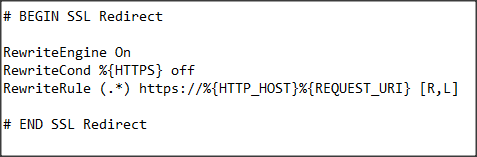
It is time to tell your website that anytime someone tries to visit a link that starts with http you want to automatically redirect them to https.
You will need to add the following code to your .htaccess. To access your .htaccess file, use the File Manager in your Hespia or CPanel. You can also access this file using FTP.
Add the code below:
“Save”
Update Google Analytics and Webmaster Tools
In Google Analytics, you will need to change your Property from using http to https.
In Google Webmaster Tools, you will want to add two properties one for https:// and one for https://www.
Create a Sitemap
There are a handful of WordPress plugins to make this final step easy. Create your Sitemap and upload it to your website using Google Webmaster Tools.
Voila! Your website now has a free SSL cert installed, you have addressed immediate redirect needs (http points to htps), you have updated your properties for Google and updated/uploaded a Sitemap for Google to crawl.
The integrity of your website has skyrocketed with under 30 minutes of work. Good job!