Click Shopify Vendor and Open a Collection Page
As with many things in Shopify, it seems like this should be a simple task. Since the Vendor “pages” are dynamically created, it is going to take a bit of coding to make this function as we would like.
Why Use Collections for Vendors?
Shopify creates a vendor search results page when you click on “Vendor” (located on your individual product page). You are unable to edit the results page that Shopify creates. If you create custom Collections for your Vendors, you can now adjust the featured image, add audio, video, content, links, logo, etc. anything you can imagine. So, how do we do it?
Well, we need to adjust the code on the product.liquid file so that it no longer tells vendor link to pull a search query. Instead, we want to match the vendor to a collection (if one exists) and if not, we will stick with the original function of pulling a search query of any product assigned to the Vendor.
Step 1
Create your collection page for your vendor. It is important that your collection has the exact name, spelling, and spacing as your Vendor otherwise this will not work. If your Vendor name uses special characters (ex: French) or if the Vendor name is more than 1 word, you will want to copy and paste in the Vendor name exactly. If it doesn’t ‘stick’, do it again. The second time you try, Shopify will display a message stating that a forwarding URL has been created. This is fine.
One your collection page, you will want to set your featured image, add your description and content. Select Automatic for displaying products and Vendor equals _____. SAVE.
“View” your collection and you will now see your changes as well as all of your products listed that are assigned to the selected Vendor.
Step 2
Visit your Store > Themes and create a copy of your site by pressing “duplicate”. If you have never done this before, you are creating a copy of your live site so that you can make the changes in a testing environment without impacting your live site. This is one of the nice features of Shopify. Once your theme duplicates, you can rename it how you like (testing area – vendor collections) and then edit the code. When you press “Preview” after making a code change, you will be taking to a fully functional live version of your site that only you can see.
Step 3
Locate the product.liquid file.
Depending on your theme, what I am about to share may or may not work for you. I hope this points you in the right direction though and helps you understand how to write if/else function for your own theme. I used this in a theme by Out of the Sandbox and it worked great, no issues.
Templates > product.liquid
Look for code similar to this:

Replace it with this code:
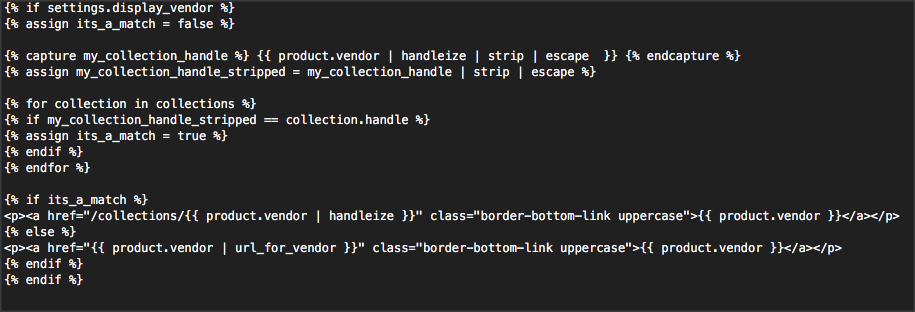
You may need to make some adjustments based on your own theme. Once it works, “publish” your test environment. It will replace your live theme and a backup of your live theme will be saved below.